This document presents the steps to set up IFTTT to connect with Huepress system and perform control of Huepress smart lighting devices through services provided by IFTTT.
The IFTTT account used throughout this document is tech@huepress.vn
After logging in to IFTTT, the main interface of IFTTT will be displayed as shown on the left below:

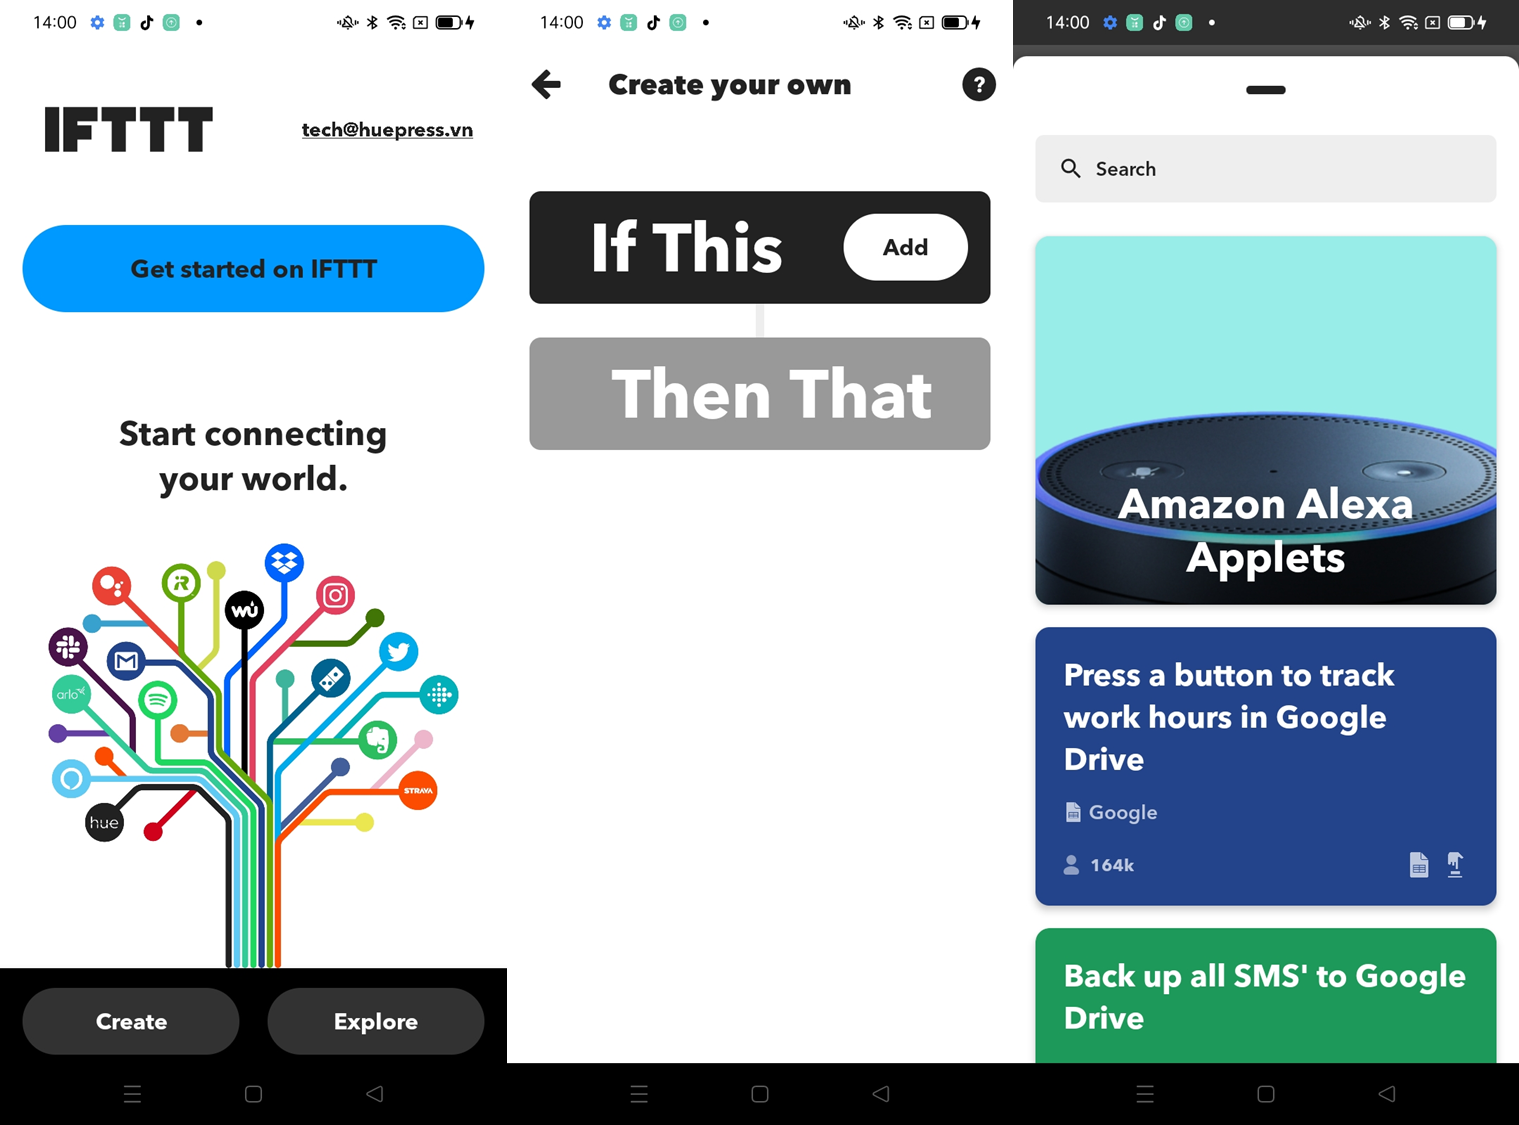
The Create button allows the user to create a new Applet (middle image), the Explore button allows the user to select and explore pre-made Applets (rightmost image). After clicking Create, the screen will switch to the interface of creating a new Applet as shown on the right. A simple Applet consists of a trigger, selected in the IF THIS field, and an action selected in the THEN THAT field.
Trigger defines when Applet is fired
Action defines what action the Applet triggers
Example: User wants to trigger an action that turns off all lights in the bedroom every time a motion sensor detects a moving object (this is an example for a basic Applet). The trigger is triggered for the event of “detecting moving objects through the sensor” and the Action being “Turn off all the lights in the bedroom”.
Trigger and Action are the two most basic components of an Applet, which users can customize according to their actual use cases. This document guides users to create a basic Applet with Trigger that when a user using Google Assistant says the command “hue test”, Action is one of the Actions created by Huepress. Note that, in actual use, users/testers can choose their own Trigger and Action.
Create Google Assistant Trigger
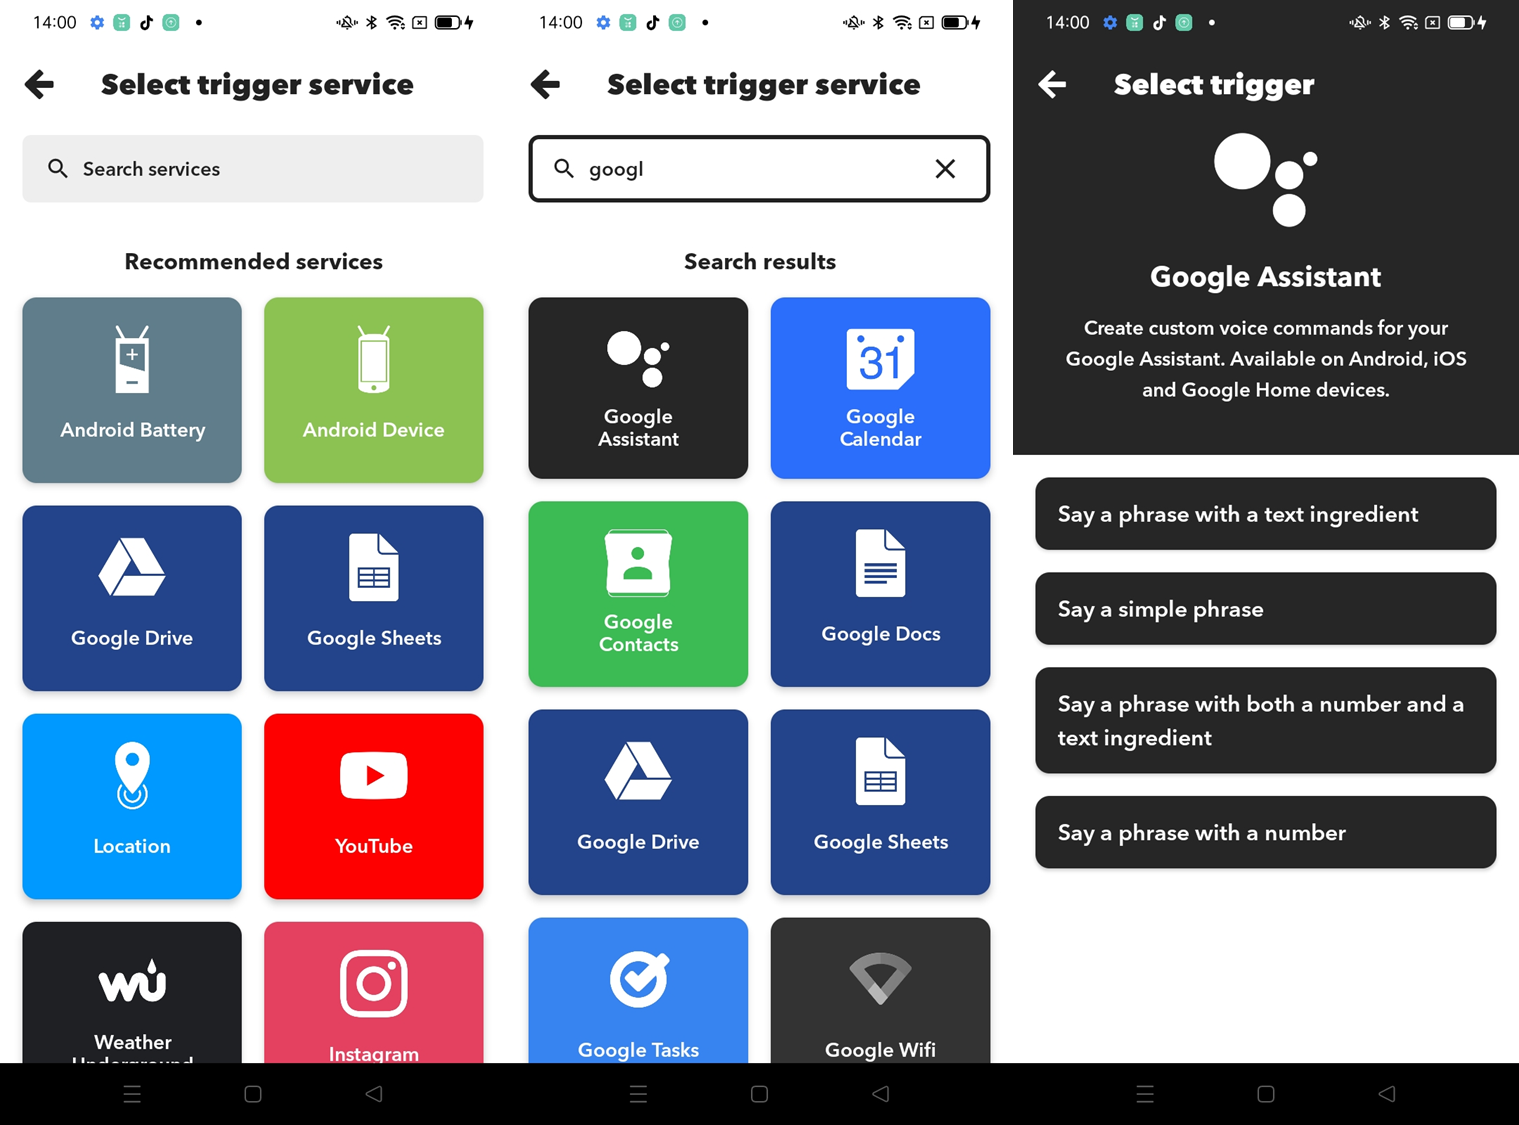
At the operation of selecting the IF THIS field, click Add, the screen will switch to the interface allowing the user to select Trigger Service (first image), on the top search bar, search google to display the services provided. by Google, in the list of services (in the 2nd picture) select Google Assistant, the screen shows all Triggers located in the Google Assistant Service, in this document use Trigger named “Say a simple phrase” , this trigger is triggered when the user uses Google Assistant and executes a simple sentence (e.g. hue test).
First let’s talk a little about the flow of IFTTT activities, IFTTT is a 3rd party that provides services to help users interact with many different companies, for example on IFTTT provides services to help users interact with Google and Huepress, so to work with both Google and Huepress through IFTTT users need the following 3 accounts:
Account for Google: this account shows which users are using Google Assistant.
Account for IFTTT: this account is the account to create an Applet.
Account for Huepress: this account identifies which user’s controlled devices are on the Huepress system.
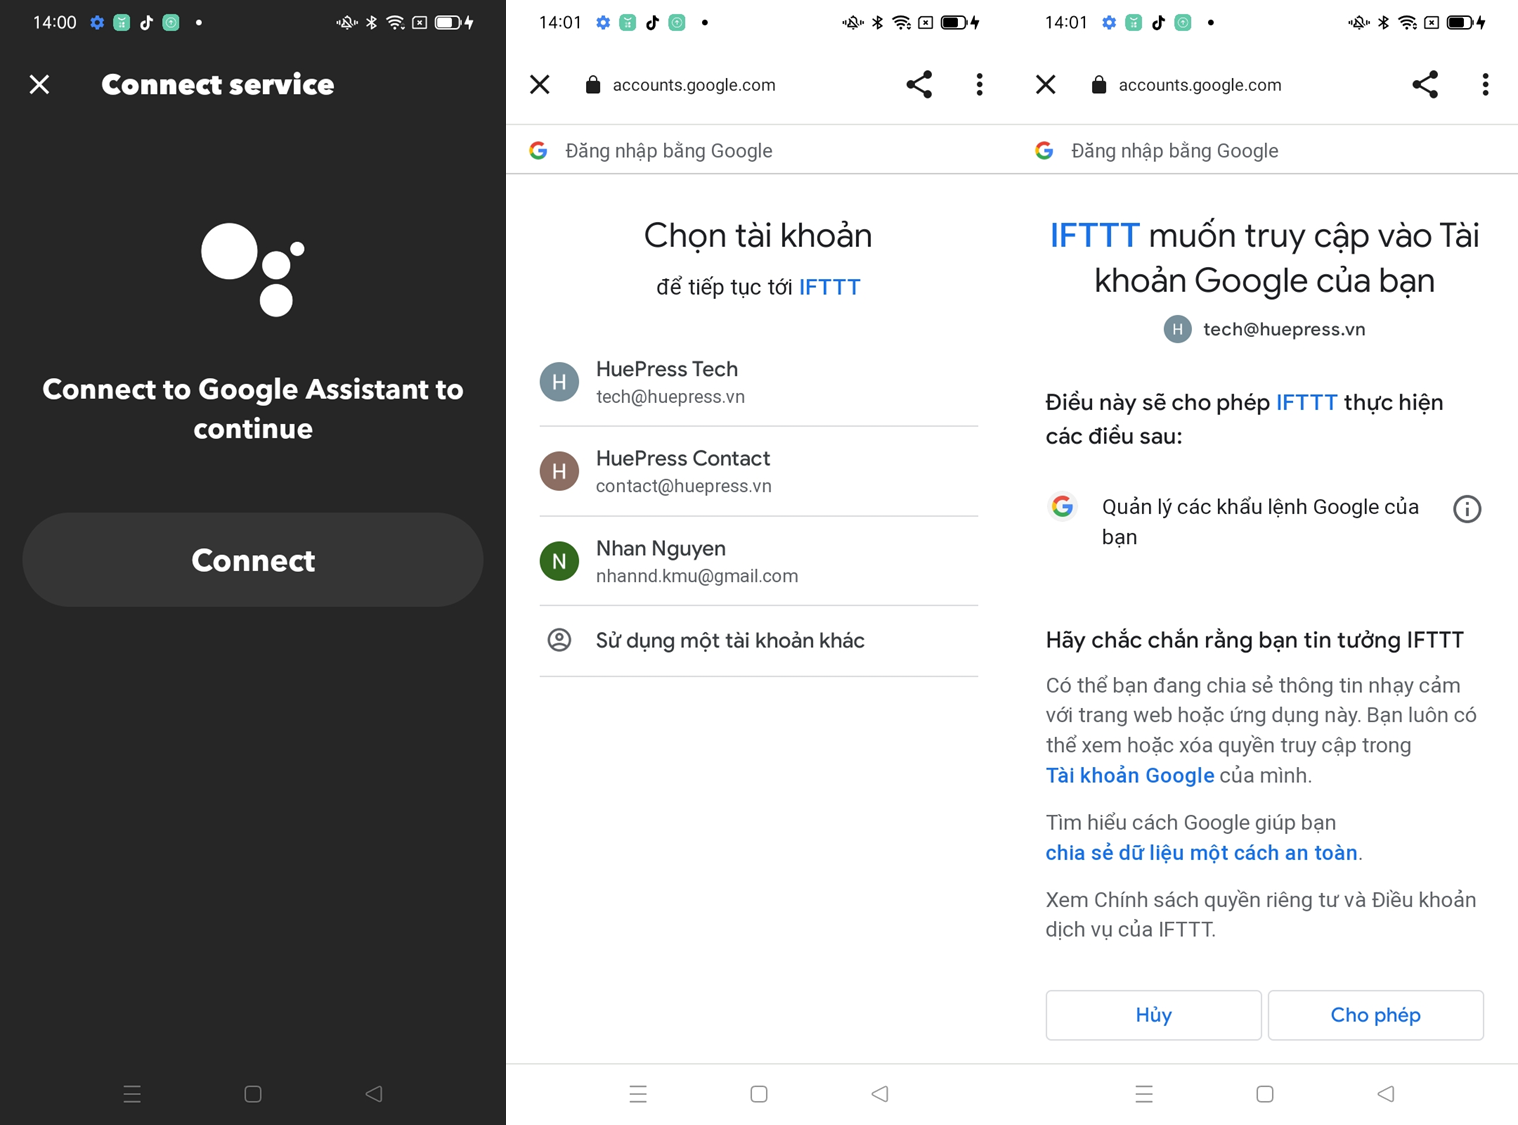
Therefore, when the user selects the “Say a simple phrase” trigger, the screen will change to the interface asking the user to connect to Google (as shown in the first image), click Connect, the user will be redirected to the login page. Google login, sign in with an account and click Allow IFTTT permissions to perform operations.

After successfully logging in with the Google account tech@huepress.vn, the IFTTT screen will switch to the configuration interface for the trigger, which provides the settings for “Say a simple phrase”. In the field “What do you want to say?” type “hue test” this is the statement to activate this trigger on Google Assistant, in the field “What do you want the Assistant to say in response?” type “okey huepress“ this is the statement that Google Assistant responds to for the user, in the Language field select English. Note: users can choose different commands for each field, in this document Huepress uses the above two commands.
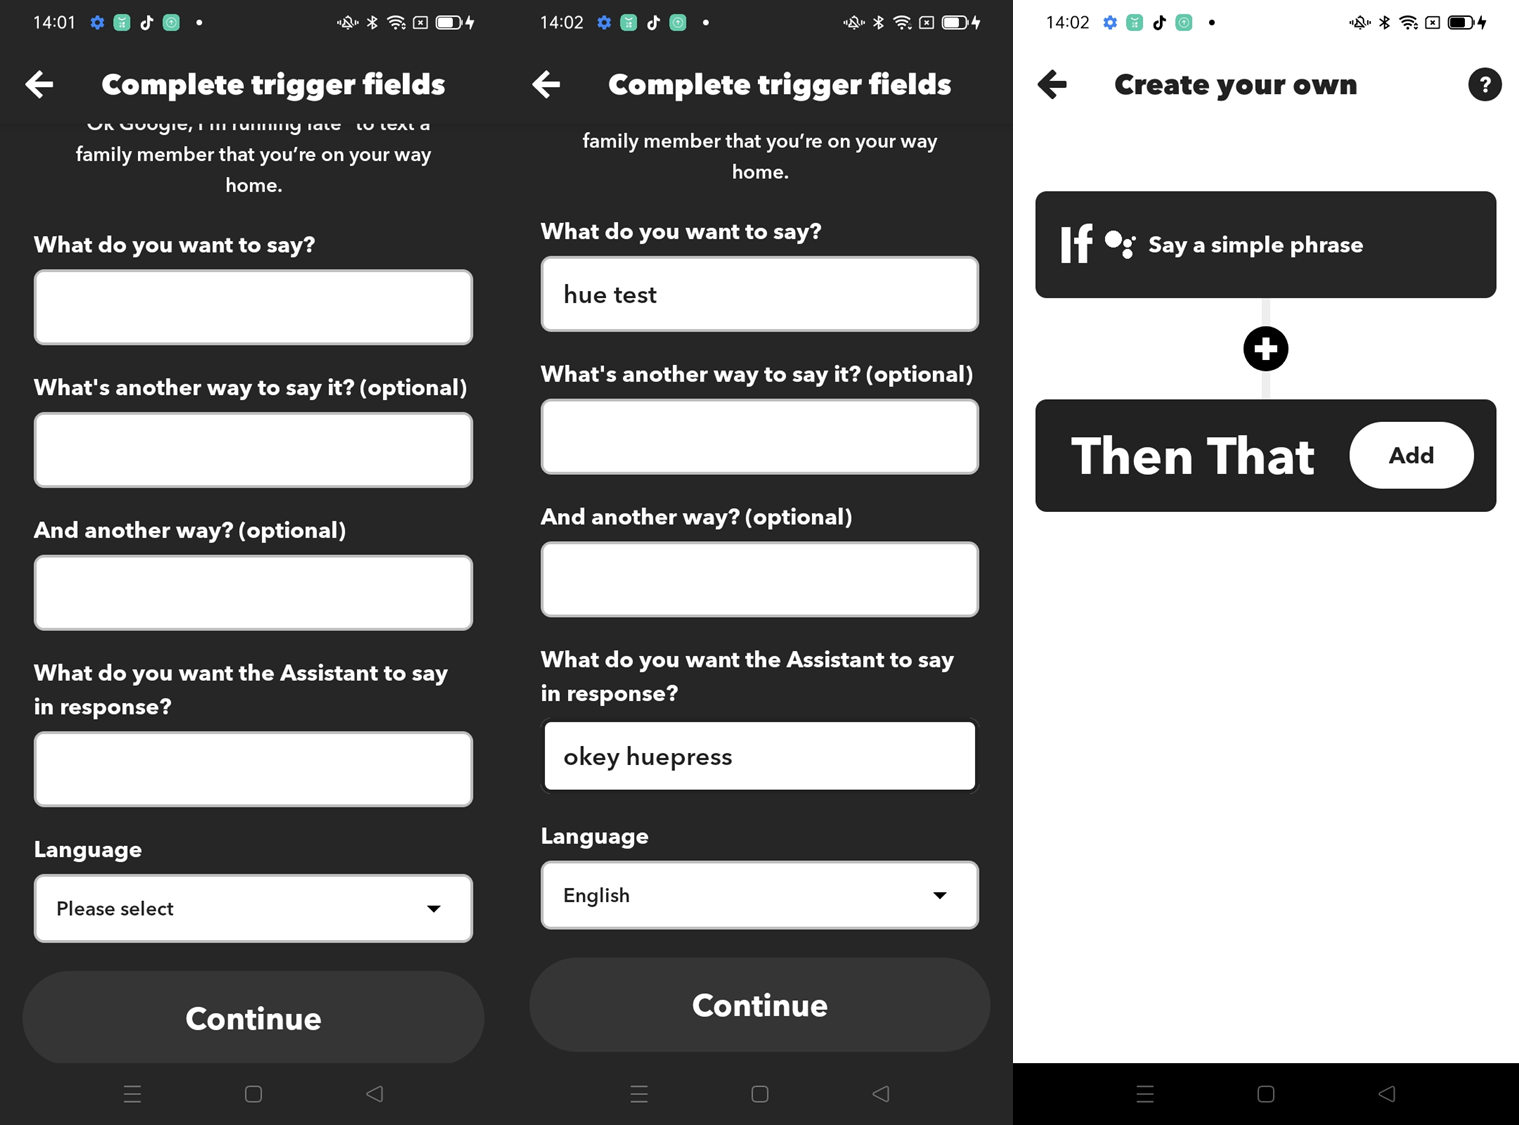

Click Continue after completing the setup, the screen will return to the Applet creation interface where the user will choose to add Action for the Applet. At this step, when the user uses Google Assistant on a Google account tech@huepress.vn, The trigger will be fired and execute the Action in the Applet.
Create a Huepress Action
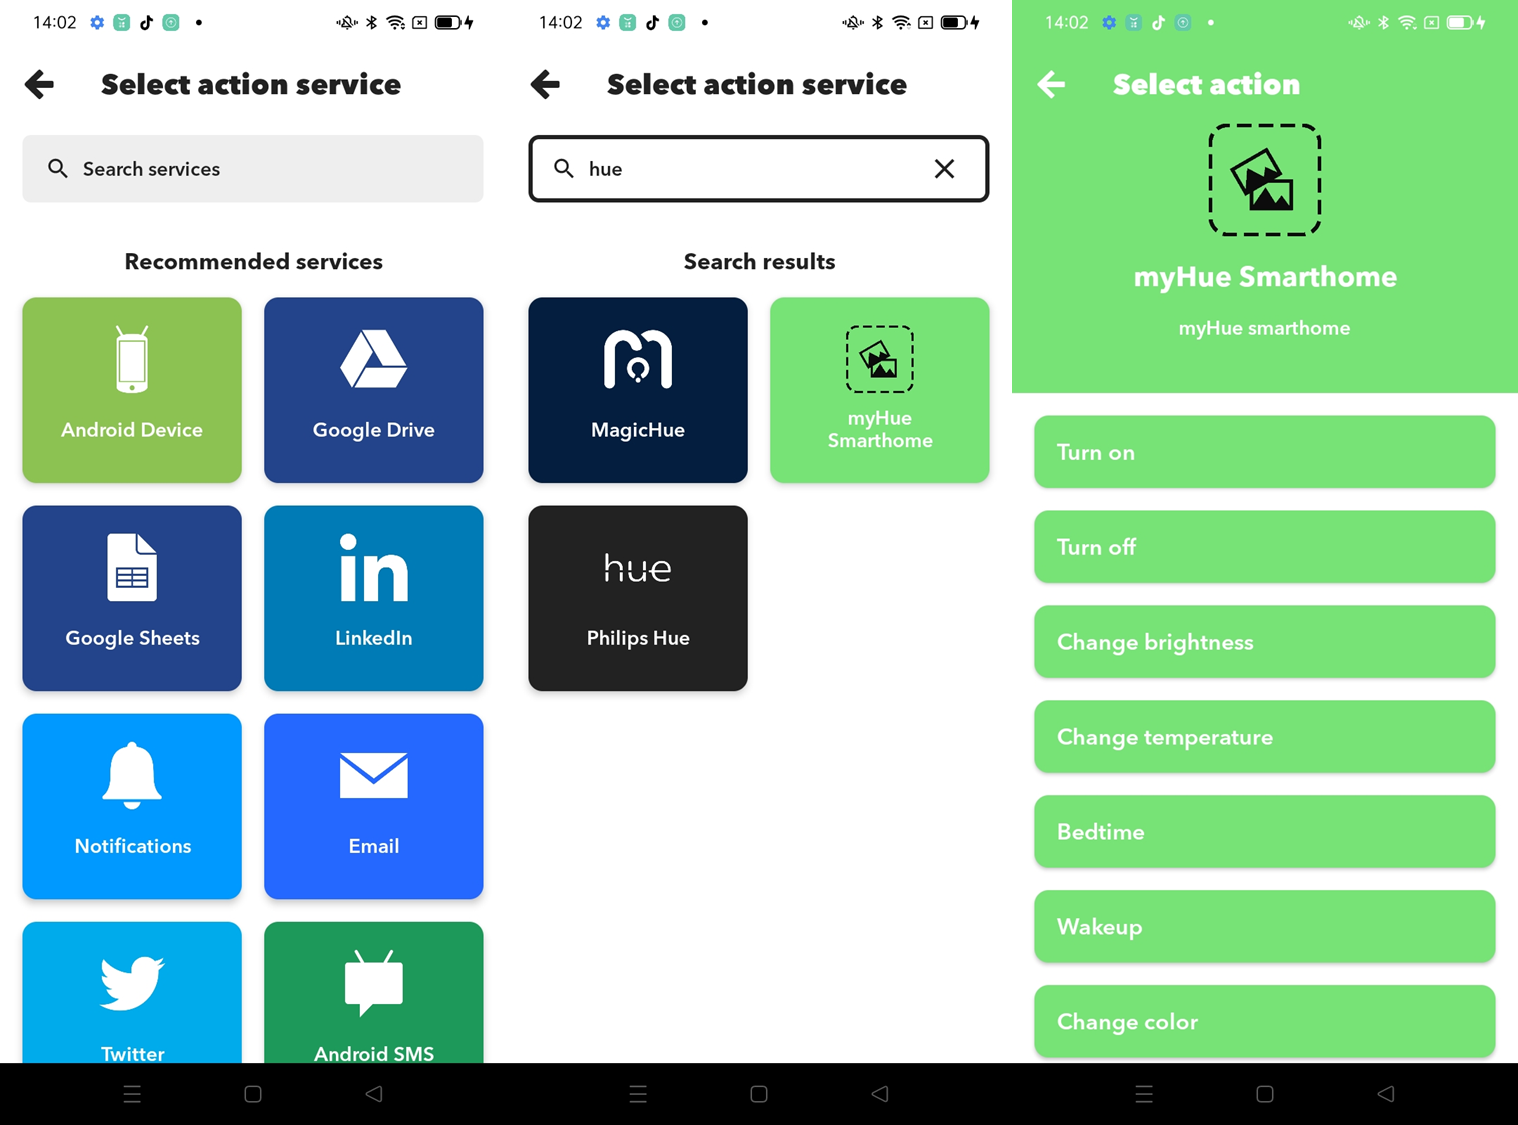

Click Add in THEN THAT field, to select Action for Applet, in the search bar on search “hue” and select myHue Smarthome – this is Huepress’s service. Currently Huepress supports the following Actions:
Turn on: turn on the light
Turn off: turn off the light
Change brightness: change the brightness
Change temperature: change color CZK
Bedtime: sleep mode
Wakeup: wake up mode
Change color: change color
Change effect: blow change effect
Party: party mode
Random effect: random effect mode
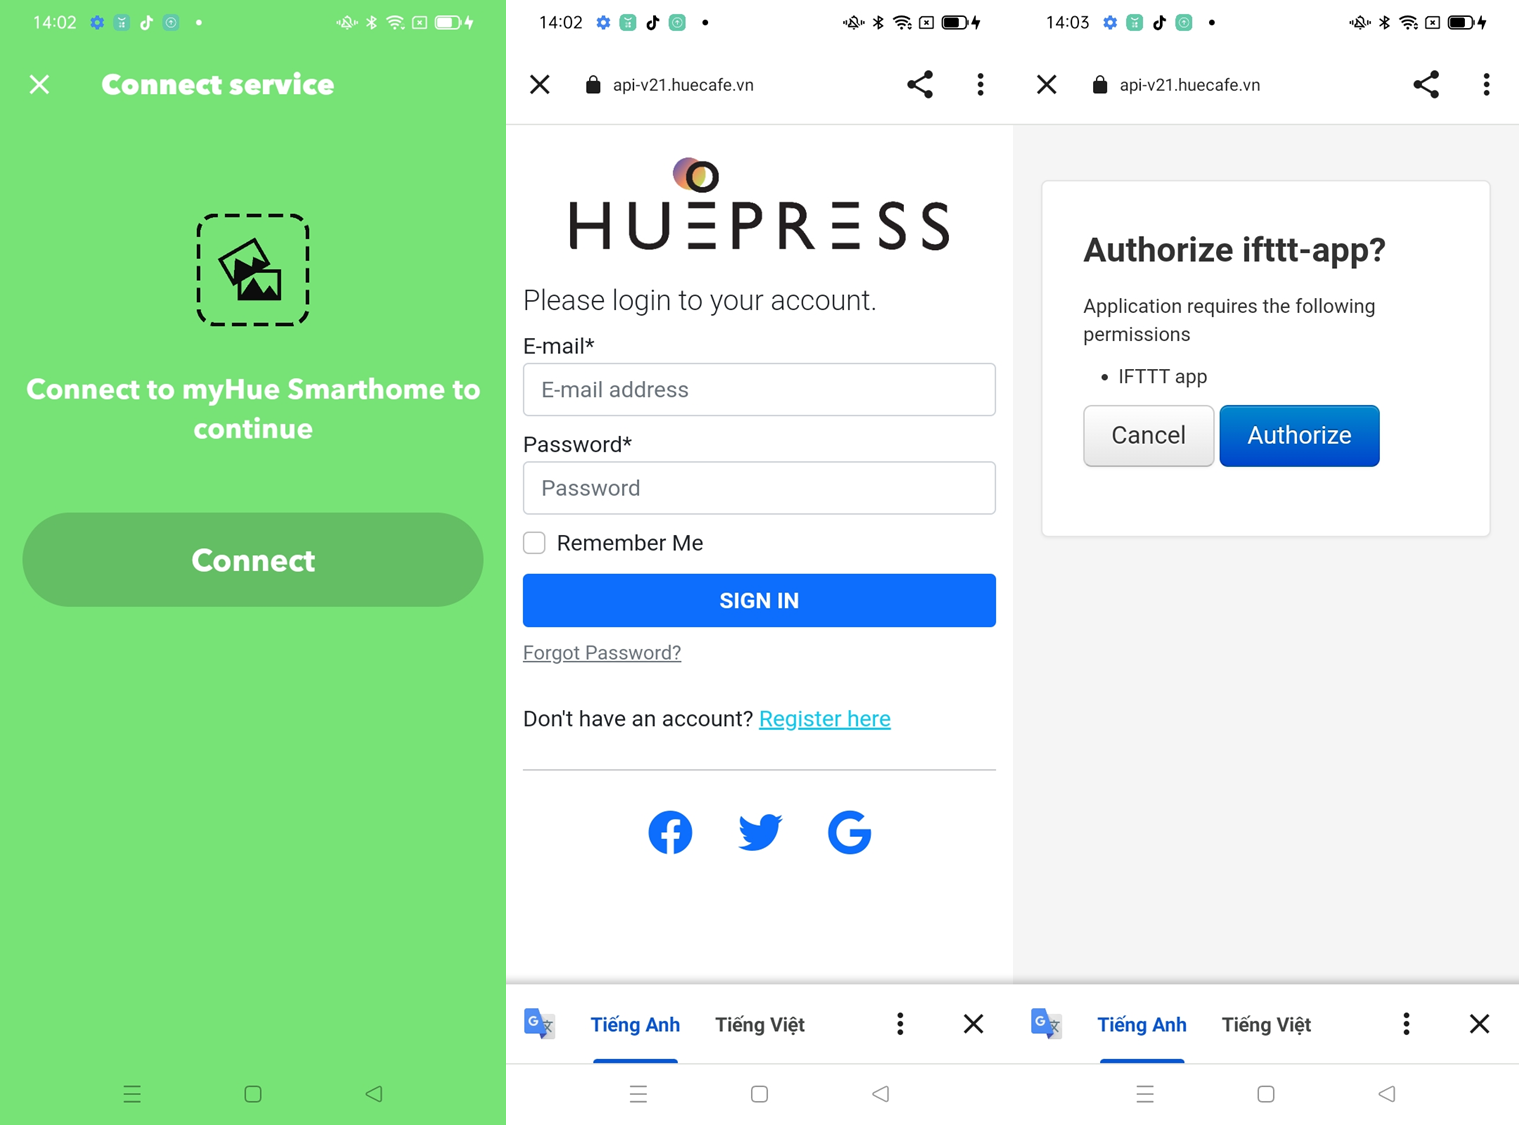
To use Huepress’s service, click Connect, user will be redirected to Huepress login page interface, enter Email/Password and click SIGN IN, user will be redirected to a page asking to accept permission for IFTTT execute your actions, click Authorize.

Users can choose one of the above Actions, in this document Huepress uses Action Turn on. On the setup screen for Action Turn on, myHue Smarthome account is the user’s email information, Which lights? is a field that allows the user to select which devices to control, the user can select individual devices, groups or all devices. Note: The home of the Office/Children’s bedroom is to display the corresponding Location Name/Group Name on the user’s account.

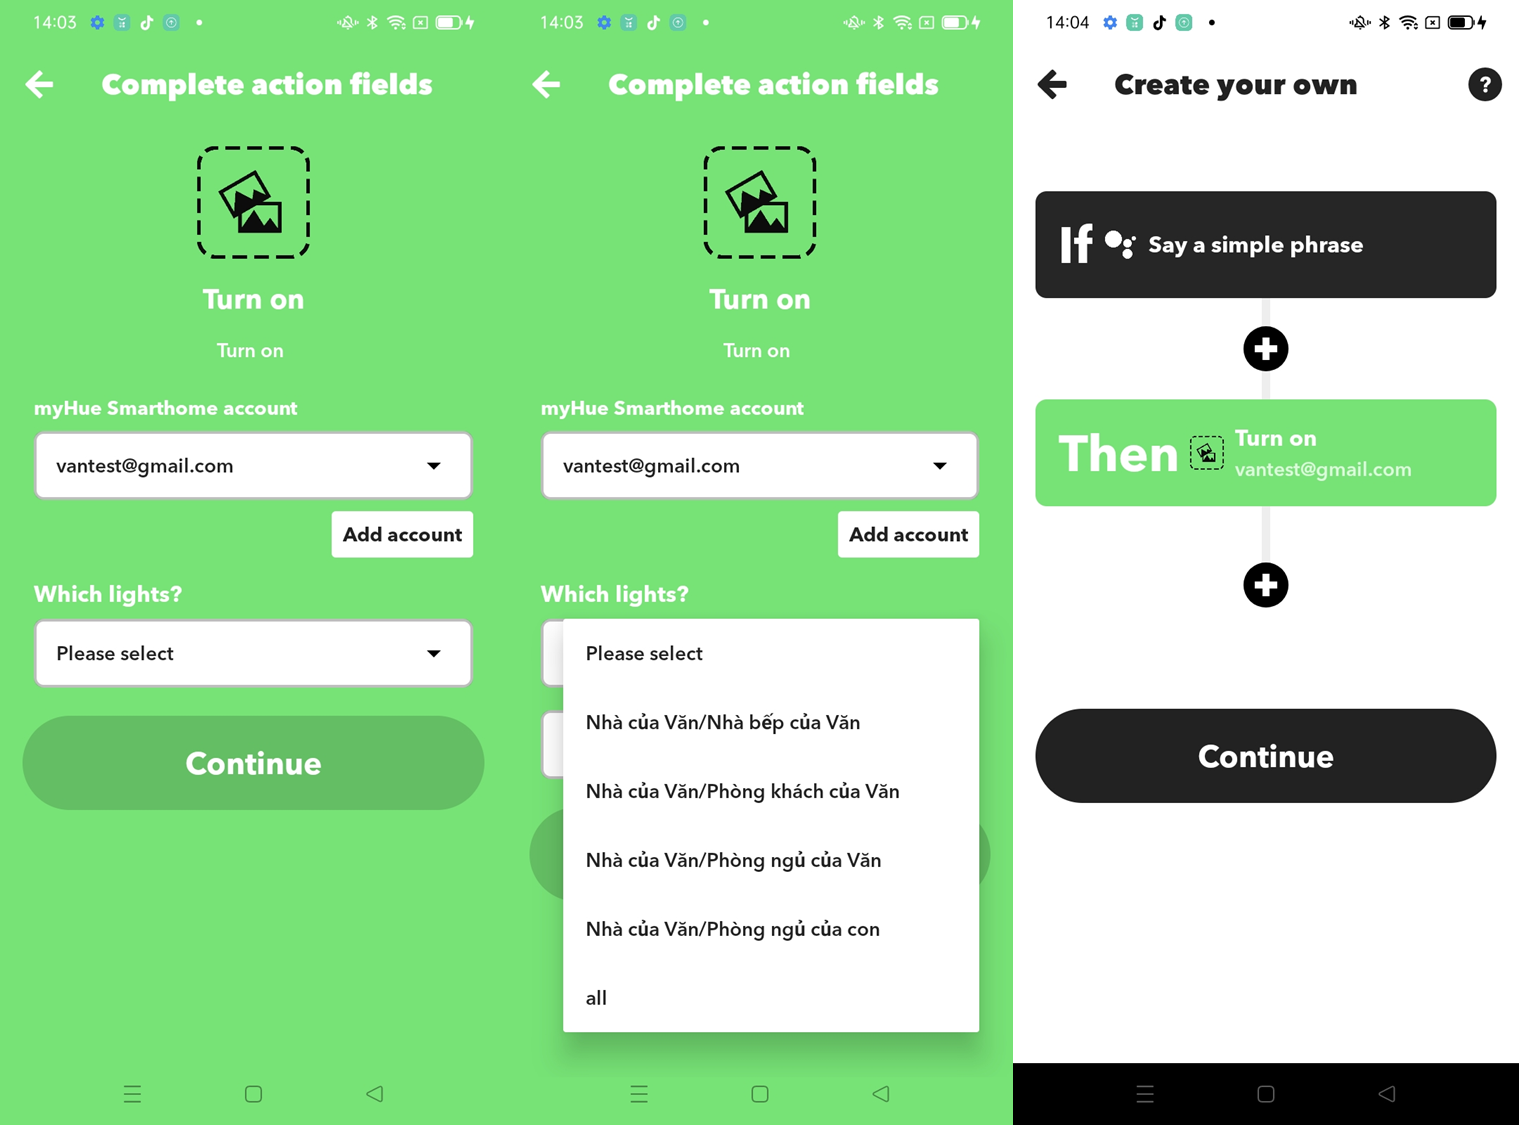
After the setup is complete, click Continue, the user will be moved to the Applet creation screen, click Continue to finish creating the Applet.

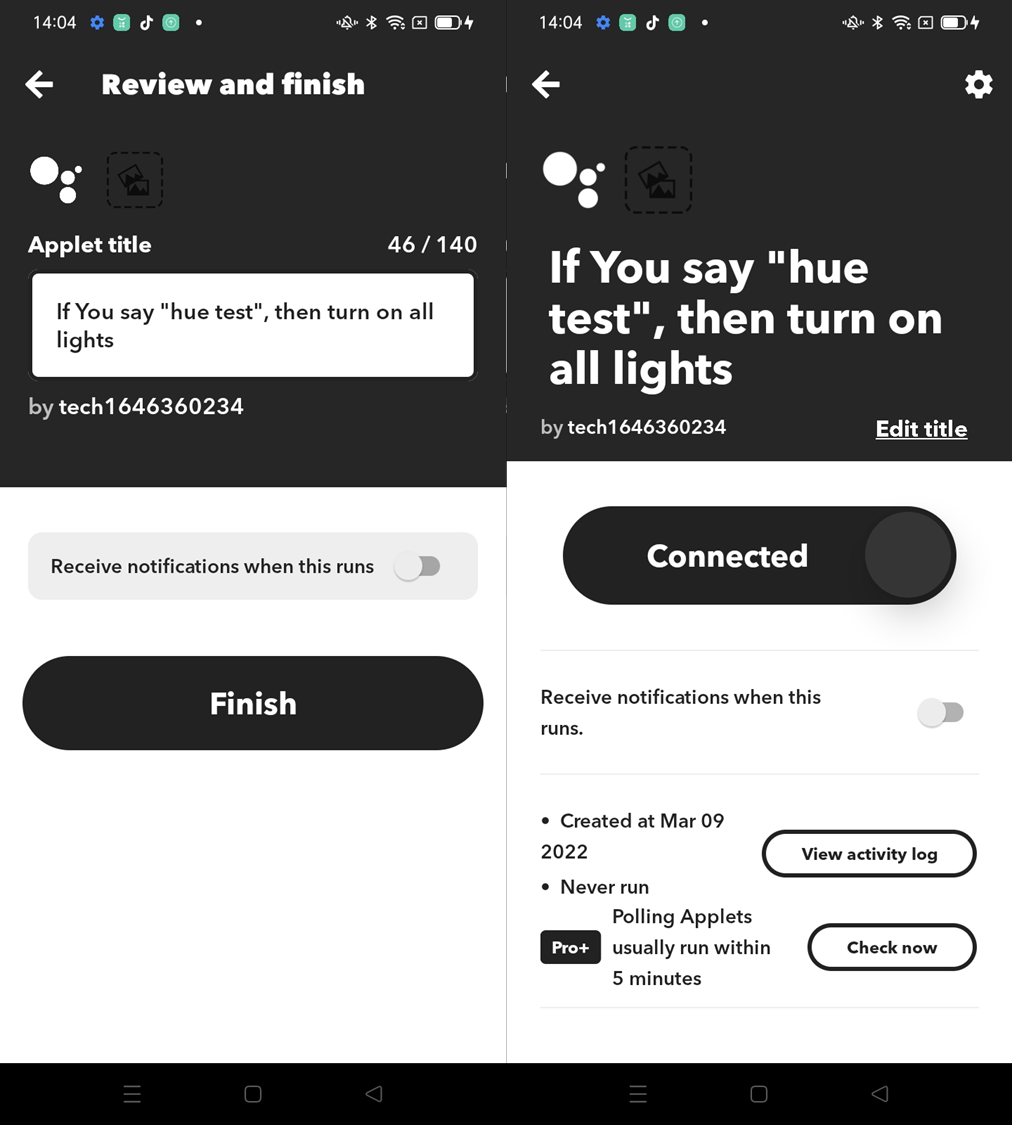
After finishing creating an Applet, the user can create an Applet title. This is a brief description for the Applet, users can create whatever they want, but Huepress recommends that you leave it as a description so you can understand what it is. an action applet. Click Finish to complete the creation.
Check Applet
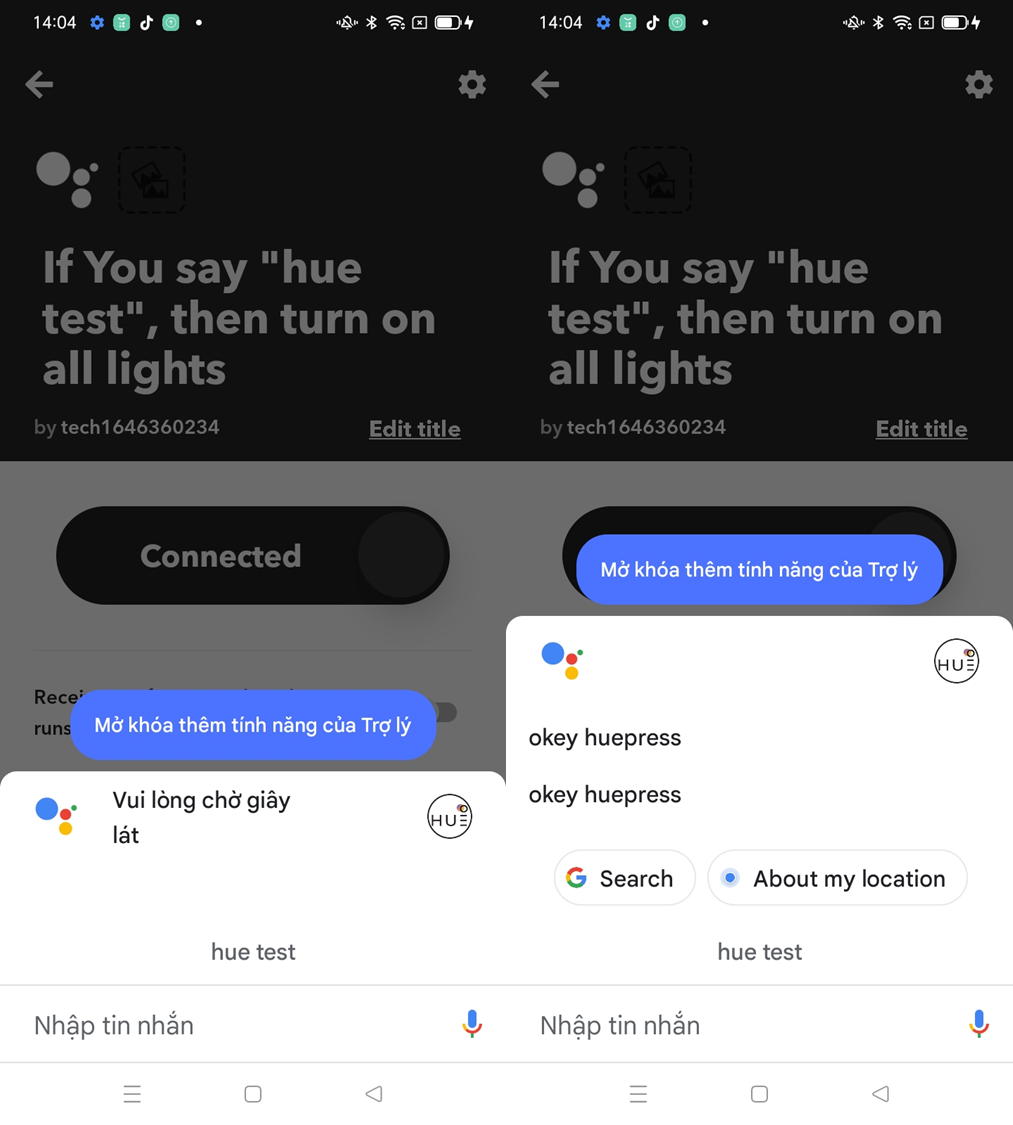
Try testing the Applet, activate the virtual assistant Google Assistant and say “hue test“, the response will be “okey huepress” and test the device. Note, the Google Assistant account in this step is the user account connected to the Google Assistant Service through IFTTT.

Supported Actions
Turn on/off:
Describe:
- This action provides the user with the ability to turn on/off the device
Establish:
- In this Action, the user can select the lights to be tested for the Action by selecting in the Which lights? Users can select all (all), select individual groups, or select individual lights. Note: Huepress does not yet support the feature of selecting multiple lights in a group.


School Which lights? will be used throughout Huepress Actions, so the rest of the Actions in this document will not represent this field.
Change brightness
Describe:
- This action provides user with device brightness changer
Establish:
- In Action Huepress provide a field called Brightness that allows the user to choose the desired brightness. The brightness value will be changed from 5%-100%.
Change temperature
Describe:
- This action provides users with the ability to change the color of K devices
Establish:
Which lights?
Temperature: This is the color value for Action, currently Huepress is using Amazon Alexa’s K color scale, which includes the following colors:
Warm white
Soft white
White
Daylight
Cool white
Brightness: This is the desired brightness value the user wants.
Bedtime
Describe:
This action provides the user with a feature to run an effect called Bedtime, which is used for the following main purpose: the user sets the light to dim until bedtime.
Establish:
Which lights?
Brightness: This is the final brightness value of the lamp, when this value is set to 0%, the light will gradually decrease in brightness until it turns off completely.
Color: This is the color value of the lamp, when reducing the brightness of the lamp, the lamp will simultaneously return to this color, this value is really useful when the user does not want to reduce the brightness to 0%.
Time duration: This is the value of the time the lamp takes to reduce the brightness, this value is 30s, which means the lamp will decrease in brightness for 30s.
Wakeup
Describe:
This action provides the user with a feature to run an effect called Wakeup, this effect is used for the following main purpose: the user sets the light to increase the brightness until awakening.
Establish:
Which lights?
Brightness: This is the final brightness value of the lamp, when this value is set to 100%, the light will gradually increase in brightness until it turns on completely.
Color: This is the color value of the lamp, when increasing the brightness of the lamp, the light will simultaneously switch to this color, this value is really useful when users want to change the color mode according to the day when they wake up.
Time duration: This is the value of the time the lamp takes to increase brightness, this value is 30s ie the light will increase in brightness in 30s.
Note: Bedtime and wakeup when used with Date & Time trigger will provide great experience!
Change color
Describe:
This action provides users with the ability to change the color of the lights
Establish:
Which lights?
Hue, Saturation, Value: 3 values on the HSV . color scale
Change effect
Describe:
This action provides the user with the ability to change the effect of the lights
Establish:
Which lights?
Effect: Effect for lights
Party
Describe:
This action gives users the ability to run an effect called Party.
Establish:
Which lights?
Time: This is the duration of color transition in an effect, the lower this value, the faster the light will flash i.e. faster transitions.
Brightness: This is the brightness value for the lamp, the light will run the Party effect at 30%, 70% or 100% brightness.
Random effect
Describe:
This action provides users with the ability to create a random effect, the variety of random will bring an interesting experience.
Establish:
Which lights?
Time step: This is the amount of time it takes to change colors in an effect, the lower this value, the faster the lights will flash, ie faster transitions.
Brightness: This is the brightness value for the lamp, the light will run the effect at 30%, 70% or 100% brightness.
Number of colors: This is the number of randomly generated colors for the effect.